Selecting Ethernet or Serial Connection
EHX can communicate with a matrix using one of the following methods:
-
Ethernet connection.
-
Serial connection if the EHX PC is connected directly to the matrix via an RS-232 cable. An Ethernet crossover cable should be used (though a straight-through CAT5 cable can be used with a switch and a modern PC manufactured after 2010). For more information, see Serial Connection
Ethernet Connection
To select an Ethernet connection:
Select Tools > Matrix Connection and select the Ethernet radio button.
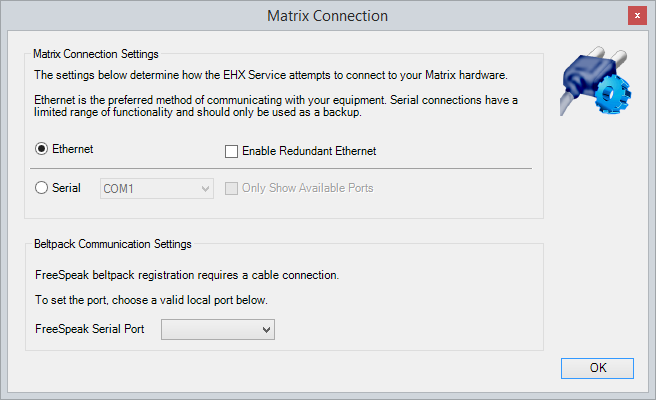
| Note: | You can also select the Enable Redundant Ethernet radio button. |
The PC is usually connected to the matrix using:
-
The LAN1 connector (a standard RJ45 connector) on the rear of the Eclipse HX-Median, Eclipse HX-Omega or Eclipse HX-Delta matrix.
LAN1 is the default connector on the matrix. LAN2 (also a standard RJ45 connector) is not configured when it leaves the factory and must be enabled in EHX.
-
The LAN connector (a standard RJ45 connector) on the rear of the Eclipse HX-PiCo.
A ferrite core must be added to the socket end of each Ethernet cable to comply with European EMC standards. A suitable ferrite core is Wurth Electronik part: 74271132. Shielded CAT5e/6 cable is recommended for Electro Magnetic Compliance in EU countries.
An Ethernet crossover cable should be used (though a straight-through CAT5 cable can be used with a switch and a modern PC manufactured after 2010).
|
Pin |
Function |
|---|---|
|
Pin 1 |
Transmit data + |
|
Pin 2 |
Transmit data - |
|
Pin 3 |
Receive data + |
|
Pin 4 |
N/C |
|
Pin 5 |
N/C |
|
Pin 6 |
Receive data - |
|
Pin 7 |
N/C |
|
Pin 8 |
N/C |
To establish communication between the PC and the Eclipse HX matrix, the PC and the matrix must be set to the same subnet. Windows provides many different methods of reconfiguring network settings.
Reconfiguring Network Settings in Windows
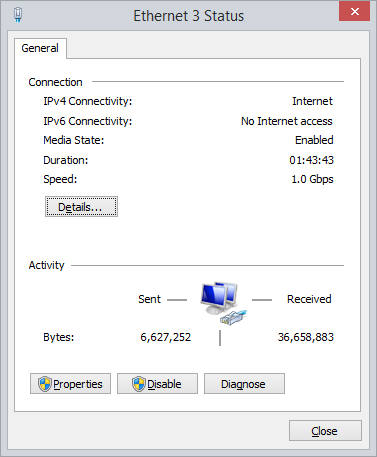
Navigate to Start > Control Panel > Network and Internet > Network and Sharing Center. The following screen appears:

-
Select Ethernet 3. The following screen appears:
-
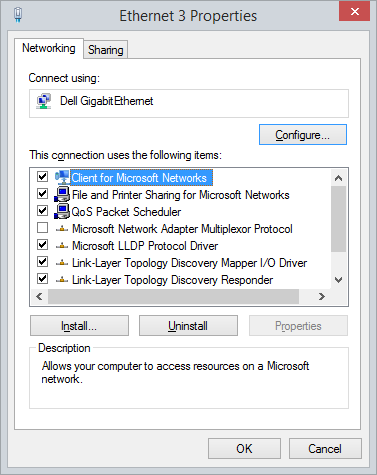
Select Properties. The following screen appears:
-
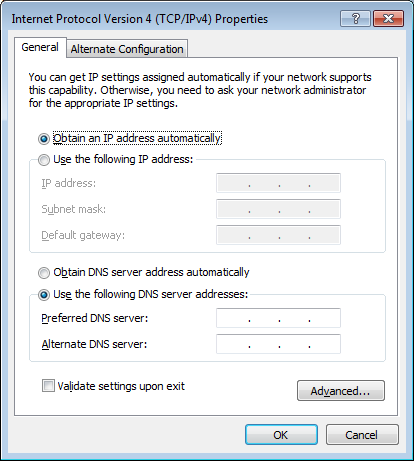
Select Internet Protocol Version 4, and then select Properties. The following screen appears:
-
Select Use the following IP address, and then enter the correct IP address (169.254.0.10) and Subnet mask (255.255.0.0), and then click OK.
| Notes: | If your matrix has a fixed/static IP address, set your PC to be in the same IP address range. |
| To establish communication between the PC and the Eclipse HX matrix, the PC and the matrix must be set to the same subnet. |
Checking Ethernet Connections with the Windows Ping Utility
If there is a problem connecting to the Eclipse HX matrix, you can use the Windows Ping utility on Ethernet to verify that the cabling and IP settings are correct.
To check the connection to the matrix with Ping:
-
From the Windows Start menu, select Run.
The Run dialog is displayed.
-
To open the command window, type cmd in the Open field and click OK.
-
Type ping xxx.xxx.xx.xxx, where the X’s represent the IP address of the Eclipse HX matrix.
-
Press Enter.
If the ping was successful, a reply is received. If the ping was not successful check the cabling and IP settings.
| Notes: | When checking the connection, ensure that Network Bridging and any firewalls are disabled. |
| If you have an Omega, Median or Delta matrix, press and release the ENG button on the main CPU card to display its IP address on its dot matrix display. | |
| If you have a PiCo matrix, go to Menu > System > Info to view the IP address of the matrix. |
Changing Matrix IP address using Matrix Event Log
It may be necessary to change the IP address of a matrix. It is recommended that the following steps be followed when the right-click layout screen IP setting change is not available, for example when the serial interface is the only available interface. The sequence of steps to change the IP address of a matrix via the event log is:
-
After starting EHX open the configuration.
-
Ensure that the PC is connected to the matrix via Ethernet or a serial link.
-
Open Matrix Event Log from the Diagnostics menu (see Using the Diagnostic Tools).
Note: To display the Diagnostics menu at least one matrix must be configured on the layout pane.
-
To connect to the matrix, press Play.
-
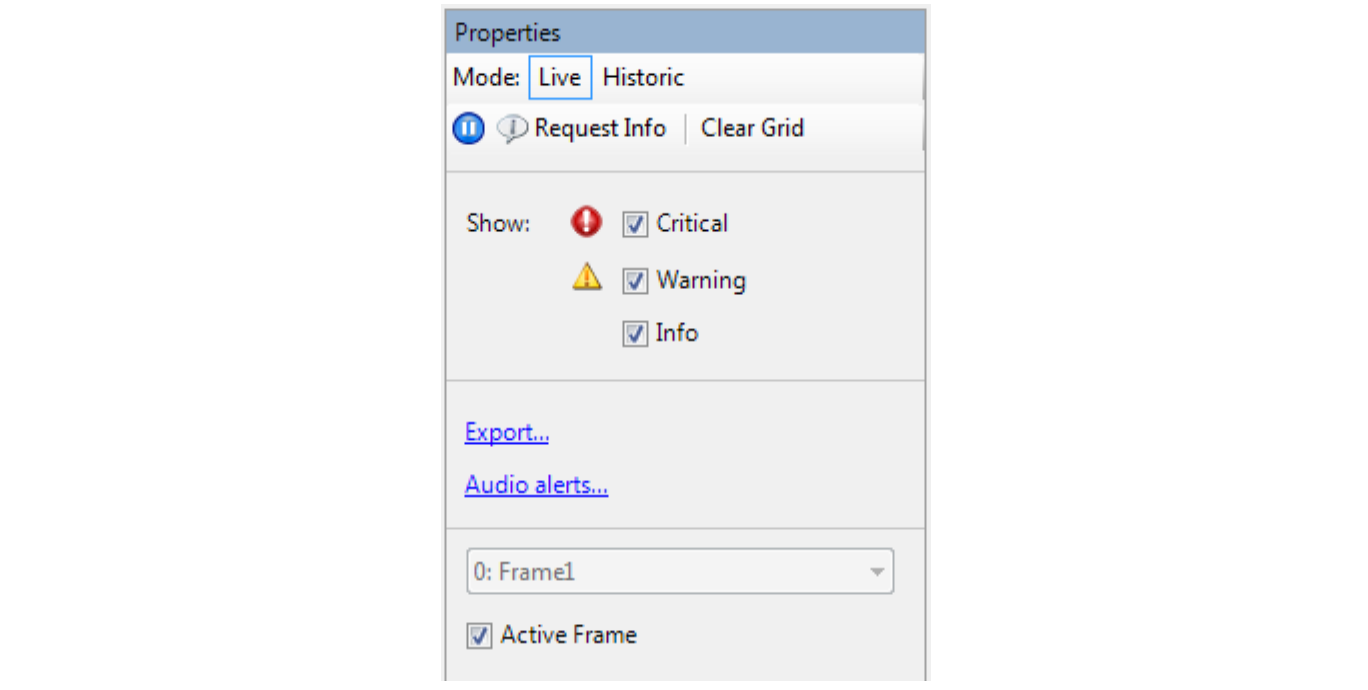
When connection is established click on the Request Info button which is displayed beside the Play icon.
-
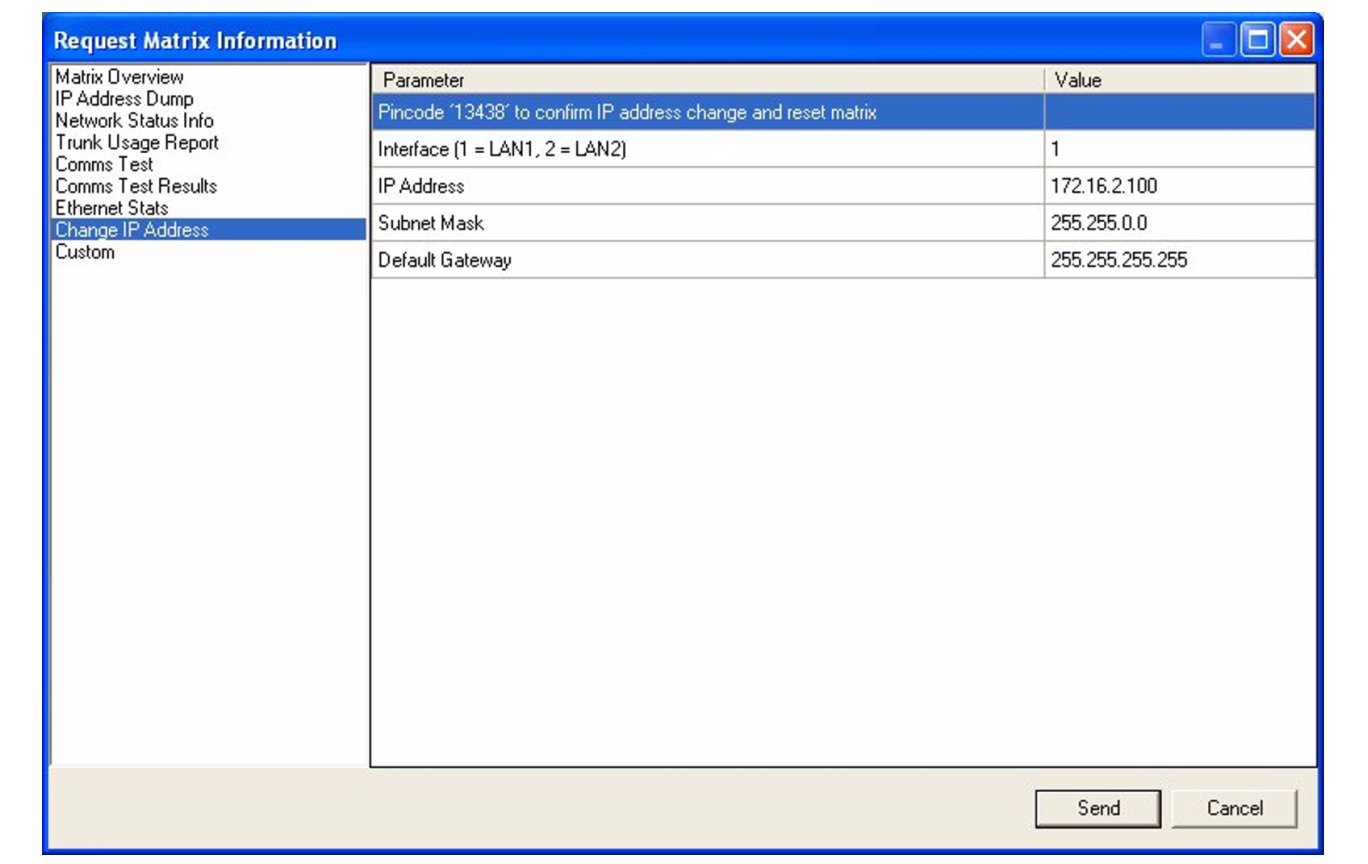
Choose Change IP Address from the list in the left-hand pane and enter the desired values listed below.
-
Select parameter 1 and enter the pin code.
-
Select parameter 2 and enter interface 1 and then enter the LAN1 port address.
-
Or, select parameter 2 and enter interface 2 and then enter the LAN2 port address (Omega, Median and Delta matrix only. By default do not set LAN2).
-
Select parameter 3 and enter the subnet mask.
-
Select parameter 4 and enter the default gateway address.
-
Click on Send to update the matrix.
-
A message from the Matrix indicating that the change was successful is seen in the log, and the matrix resets.
-
Close Matrix Event Log, and open Systems > Layout.
-
Change the IP address in Systems > Layout to be the same as the new value in the matrix.
-
Press File > Save.
| Note: | It may be necessary to change the IP address and subnet mask of the PC if the new matrix IP address is from a different network range. |
Serial Connection
| Note: | Ethernet is the recommended connection type for all applications. Serial connections are limited to a single matrix, have a limited range of functionality and should only be used for backup purposes. |
To establish a serial connection between the EHX PC and the matrix the hardware must be connected first and then the software configured.
To establish the hardware connection, connect a serial (RS-232) cable between the computer's serial port and the connector labelled RS-232 on the rear of the Eclipse HX matrix.
To set up a serial connection between EHX and the Eclipse HX matrix:
- From the EHX command line, open the Tools menu and select Matrix Connection. The Matrix Connection dialog is displayed.
Ethernet connection is the default.
- Select the Serial radio button.
- From the drop-down menu, select the COM port on the PC the serial cable is connected to.
Note: Click Only Show Available Ports to display the available COM ports on the computer.
- Select OK.
| Note: | When using a serial connection, the left-hand menu pane is highlighted in purple. |