IP Directs and Trunks
The Eclipse IVC-32 cards allow directs and trunks over IP network infrastructure. All IP trunks and directs can be compared directly to four-wire trunks and directs. They comprise:
-
A single full duplex audio channel
-
Known start and end points
Links have to be made over IP before the trunk/direct can be used.
One side calls the other to set up the link and is known as the VoIP caller. The other side receiving the call checks and decides if it can set up the link – this is the recipient.
If a recipient is not reachable:
-
The caller tries three times to establish call
-
After it stops trying, a background process checks to see if it’s reachable again
-
Calls will start to try again if the process sees the recipient
Calls can be refused by the receiver, if:
-
The caller is trying to use a non-existent user name
-
The caller is using the wrong password
-
The caller is not the expected port type (for example, Trunk calling a Panel)
-
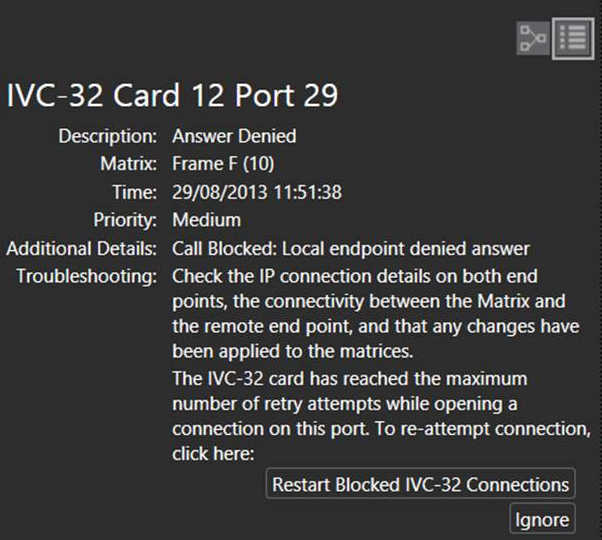
The call is refused three times, the caller stops calling
If the call is refused three times, to continue making the call you must select Restart Blocked Connections at the bottom of the IVC-32 Diagnostics screen.
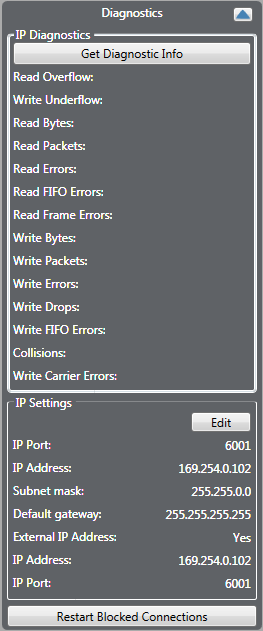
You can also access the Restart Blocked Connections button by selecting Detailed at the top right of the Monitoring screen.
Configuring an IP direct
-
In the Cards and Ports screen, for each of the IVC-32 cards, right-click on the card and select Card Properties.
-
From the IVC-32 Card Properties screen, enter valid IP addresses and gateways for the card.
-
In the Cards and Ports screen, select the IP direct port.
-
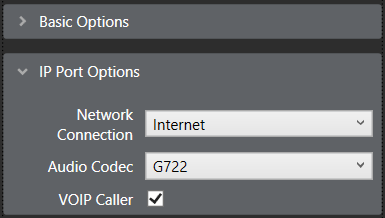
From the properties list, select IP Port Options.
-
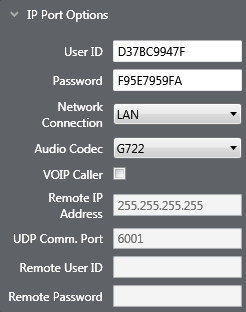
For the caller IVC-32 card, select the VOIP Caller checkbox. The other card will be the recipient.
-
Enter the IP address of the recipient’s IVC-32 card into the caller’s Remote IP Address so it can make setup the call.
-
Enter a unique User ID and Password set which matches the IP Direct Port recipient to identify the port it is linking to.
-
Navigate to the recipient IVC-32 IP Direct Port and ensure that the User ID and Password match what was set in the caller settings.
Note: The following settings can be ignored:
-
Local User ID/Password can be ignored for caller
-
Remote IP and User ID/Password can be ignored for recipient
Once set up, the IP Direct ports will behave in the same manner as all other Direct ports
As each caller can point to a unique IP address, IP directs on one IVC-32 can link to 32 different destination devices. IP directs cannot link back to a direct on the same card, but can link to other cards on the same Eclipse matrix.
Configuring an IP trunk
-
In the Cards and Ports screen, for each of the IVC-32 cards, right-click on the card and select Card Properties.
-
From the IVC-32 Card Properties screen, enter valid IP addresses and gateways for the card.
-
In the Cards and Ports screen, select the trunk port.
-
From the properties list, select IP Port Options, and enter valid settings for the Network Connection, Audio Codec and VOIP Caller. The VoIP caller field will be automatically populated when the trunk lines are drawn on the layout screen.
-
Repeat for any matrices in the linked set you wish to link over IP (1 port per trunk link, point to point).
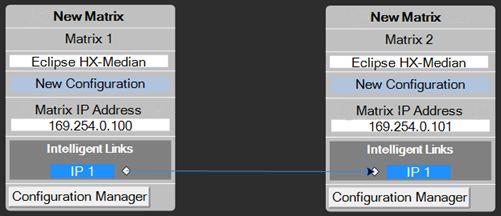
-
In the Layout screen, drag the trunk links as required. The direction of the drag creates the link as Caller to Recipient.
| Note: | Right-clicking on the link and the ports allow you to change caller, network connection type and flip ports. |