Security
Warning
The CCM ensures that you do not turn off port 80 without testing your certificate. If you turn off port 80 without ensuring that you can reach the CCM using port 433 it is possible to get locked out of your CCM. If this happens, you must reset the Arcadia from the front panel menus. This will remove all configuration, including network details from your Arcadia.
| Note: | Some knowledge of certificate authorization and HTTPS is needed when setting up a secure connection between a PC hosting the Core Configuration Manager (CCM) and a Arcadia. |
| Note: | Each browser type (for example, Safari, Chrome, Edge, Firefox) uses its own method for certificate management. These methods can change with time and is beyond the control of Clear-Com. Please refer to the instructions supplied with your browser if you require more information. |
The following are some of the main security features.
HTTPS is an adaptation of the HTTP protocol. It protects against an intermediary being able to intercept data between devices, using data encryption and Public Key Cryptography to create a secured channel.
When using the CCM to establish your intercom setup, you might wish to protect your login credentials and configuration details from unauthorized interference. In this case you will establish an encrypted connection between the CCM and your Arcadia using the Force HTTPS feature.
The Arcadia uses port 80 (HTTP) and port 433 (HTTPS) for management. If you wish to create a secured route for data between the CCM and the Arcadia you must:
This creates a certified and encrypted connection between the Arcadia and the PC accessing the CCM.
Chose and install a security certificate on the PC or browser used to reach the CCM of the Arcadia. Clear-Com offers a choice of 3 different types of certificate, offering different levels of security.
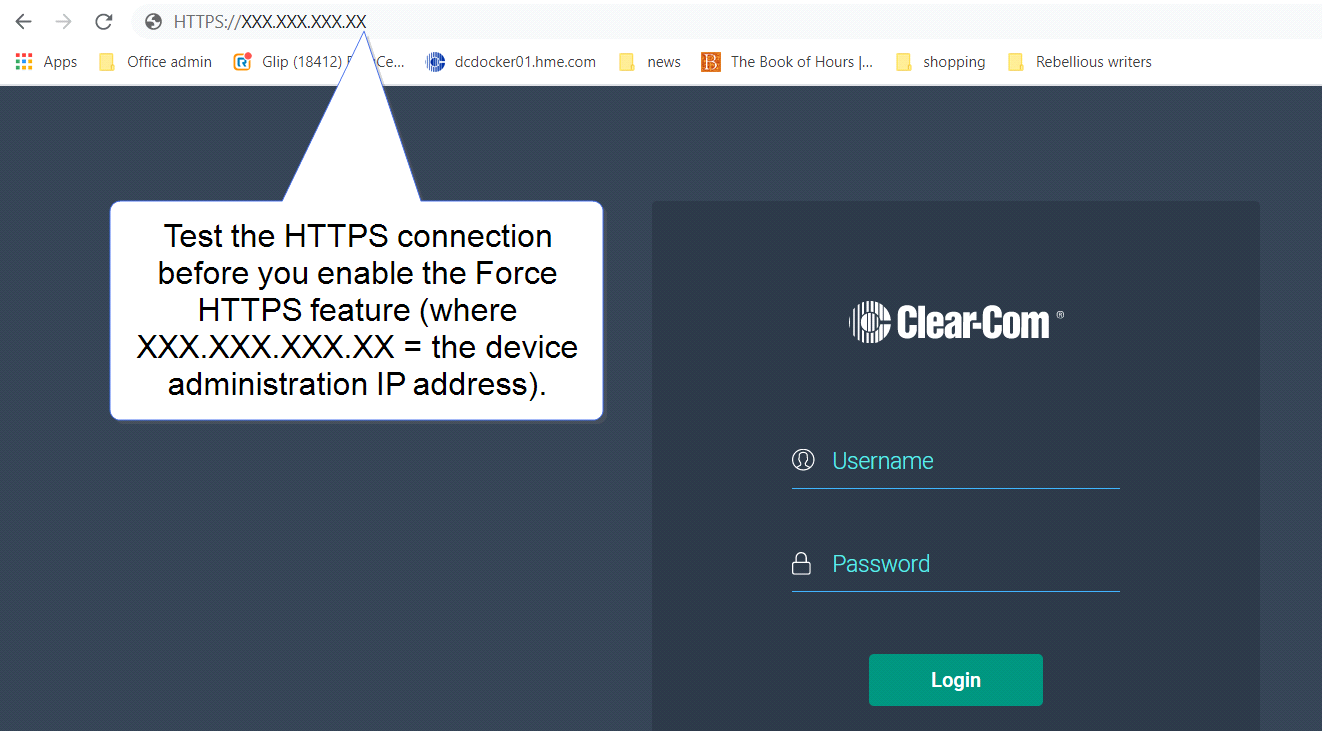
Test the certificate by trying to reach the CCM on the HTTPS port. Type: HTTPS:// device IP address in the browser URL field and press the [Enter] key.
To enable Force HTTPS in the CCM navigate to: Hardware > Resources > Host  > Security and click to enable Force HTTPS. This turns port 80 off, forcing traffic to use port 433.

There are three types of security certificate available. Choose the certification option that best suits your security requirements:
A certificate of your own choosing (full chain and private key)
An EasyDNS authorized certificate for *.clearcomdevices.com (this option requires you to register your Arcadia with a DNS server) and cannot be used unless your Arcadia has internet access
The Clear-Com self-signed certificate
More detail about certificates:
A certificate of your own choosing. This option gives you complete control over the security of your Arcadia. This option requires specialized knowledge about how to obtain a full chain certificate and private key, and how to install them on your browser. When using your own certificate you might have to provide a DNS server address and register the Arcadia.
The EasyDNS certificate. This is a commercial Arcadia certificate. When using the EasyDNS certificate you have to have a DNS server address for registration and a gateway for your device in order for the browser to verify the certificate with AlphaSSL and GlobalSign.
The Clear-Com self-signed certificate (default). This certificate can be used in a private network (does not require Internet access to verify the certificate). It can also be used to perform an initial test of your security setup. Warning: Browsers can be configured to trust the self-signed certificate, but this process will vary between browsers.
EasyDNS update button (Arcadia 4.1and up)
The Easy DNS certificate expires every 12 months. Use the Update Certificate button to download and install the latest certificate from Skyport. This requires an internet connection
Find the update button in: Hardware > Host > Security > Update Certificate.
| Note: | The certificate will not download if the Arcadia clock is wrong. Therefore, you are advised to sync the clock before downloading the certificate (Status > Host Device > Tools > Sync Clock). |